Select one or more of the actions you would like to perform on Capcade. (Don’t worry, these only serve as indicators and won’t pigeonhole your organization into a specific role.)
Fill out the relevant details for your organization (name, address, etc.).
Select where you want your data to be stored (EU and US data centers are free; country-specific data centers are a premium option to discuss with your account representative).
Hit Submit! We will review your registration and contact you right away.
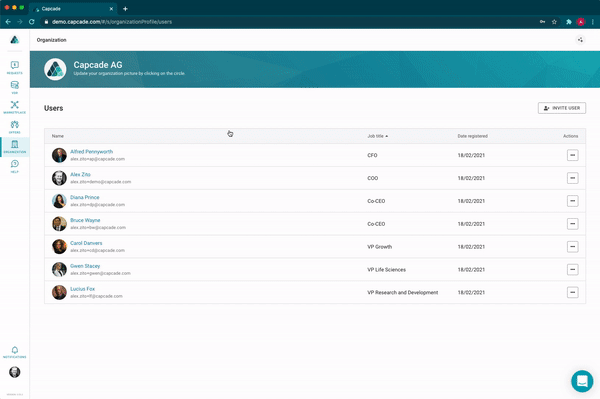
Inviting Colleagues
Inviting colleagues to Capcade is easy.
Inviting one or multiple colleagues to Capcade can be done in under 30 seconds:
Go to the Organization section.
Select Users.
Press the Invite User button.
Invite one or multiple users to your organization.
Your colleague(s) will receive an invite in their inbox.
Creating Groups
Creating Groups is a great way to make permissions easier.
Groups and Permissions is a powerful feature, especially if you have a large team, complex transactions, or multiple VDRs.
Instead of managing colleagues’ permissions and access rights one at a time, you can group them together and organize in one fell swoop:
Go to the Organization section.
Select Groups and Permissions.
Press the Create Group button.
Label and describe the group.
Add your relevant colleagues.
Creating a Transaction
All Capcade transactions are created as drafts first so your colleagues can work together before finalizing.
Creating a draft is the first step when raising capital, creating an RfP, or any other transaction you can perform on Capcade.
After entering a few basic details, a transaction can be created in draft mode so you can invite colleagues to work on it with you before finalizing.
It’s important to note: all permissions and visibilities are set to off by default, so the owner of the transaction is always in control of who can enter and what can be seen.
Steps to create a transaction:
Go to the Requests section.
In the Owned request tab, press the Create New Transaction button.
Select the type of transaction.
Enter basic details.
Press the Create Request button.
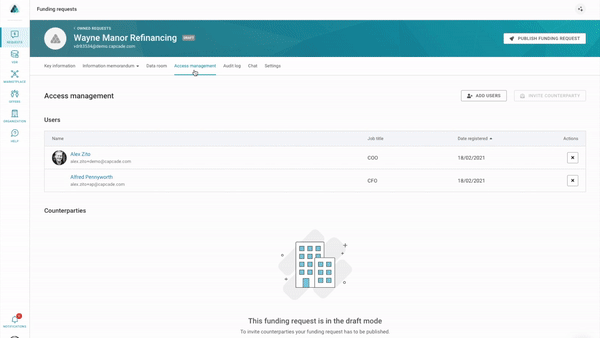
Orchestrating a Transaction
Capcade makes orchestrating transactions easier than ever.
Once your transaction is up in draft mode, you can invite colleagues, upload documents to the data room, set permissions, and finalize what work needs to be done before it’s shared with potential counterparties.
Steps to orchestrate:
Select the relevant transaction from the Owned request tab in the Requests section.
Select Access Management.
Invite colleagues to the transaction with the Add Users button.
Select Data Room and upload files and folders.
Press the Document Permissions button to grant view and edit rights to relevant files and folders.
Once a transaction is set live with outside organizations able to access it, most of the same workflows of permissions and access rights remain the same.


.svg)


.svg)


.svg)